こんにちは。サービスデリバリーセンター(SDC)のあおやまです。
つい最近「Azure Functions」で動く「Spring Cloud Function(SpringBoot)」アプリケーションを開発する機会があり、その際に調査した結果をまとめてみました。
「Microsoft Azure」で提供されているイベントトリガー起動のサーバーレス・コンピューティングサービスです。
(参考:Azure Functions)
AWSでも同様のサーバーレス・コンピューティングサービスとして「AWS Lambda」が提供されていますが、「Azure Functions」ではアプリの形態(ホスティングプラン)を選択できる特徴があります。
ホスティングプランは以下の3つがあります。
・従量課金プラン
・Premium プラン
・専用 (App Service) プラン
(参考:Azure Functions のスケールとホスティング)
「従量課金プラン」はいわゆる一般的なサーバーレス・コンピューティングサービスで、関数の実行時間にのみ課金される安価な仕組みとなりますが以下のデメリットもあります。
・タイムアウト時間が短めのため、長時間の処理は実施できない
・コールドスタートとなった場合に起動時に時間がかかる(処理を開始するのが遅い)
上記のデメリットについて「AWS Lambda」では別の形で実装することで解決しないといけないのですが、「Azure Functions」ではホスティングプランを「専用 (App Service) プラン」に変更するだけで上記デメリットを解消することが出来ます。(金額は高価になりますが)
アプリの実装を変えずに「安価だが時間制約の強いサーバレス」と「高価だが時間制約のないサーバレス」と自由に変更できるのは大きなメリットに感じます。
なお、このブログの「Azure Functions」についてはランタイムバージョンを「2.x」前提としています。
(参考:Azure Functions ランタイム バージョンの概要)
今回は日次で動かすバッチアプリケーションを「Azure Functions」に乗せたのですが採用に至った理由は以下の通りです。
- 他のWEBアプリケーションをSpringBootで開発しておりモジュールを再利用したい
- 日次で特定の時間しか動かないバッチのために専用VMを立ち上げたくない
- 起動に時間がかかるサーバレスにありがちな問題もバッチなら気にしなくてよい
- バッチの処理は軽いので「従量課金プラン」でいけそう、制限時間内に終わらない問題が起きた場合でも「専用プラン」に変更することにより、いざというときになんとかなりそう
「Spring Cloud Function」とはクラウドネイティブなアプリケーションを開発するためのフレームワーク「Spring Cloud」のサブプロジェクトです。
(参考:Spring Cloud Function)
「Spring Cloud Function」を利用することにより、「Azure Functions」「AWS Lambda」などのサーバーレス・コンピューティングサービス毎の実装の差異を極小化し、通常のSpringBootのアプリを開発するように簡単に関数アプリケーションを開発することができます。
今回の作業は以下のガイドを参考にしながら行いました。
(参考:Azure での Spring Cloud Function の概要)
※こちらのガイドではHTTPリクエストトリガーで動くサンプルとなっていますが、当記事ではスケジュール起動するサンプルを作成しています。
まずは開発するためのローカル環境をセットアップします。
通常のJava開発するためのEclipseはセットアップ済みとします。
- Windows 10
- Pleiades All in One (2019-03)
またガイドに沿ってビルドには「Maven」を利用します。
開発した関数をローカルで実行できる「Azure Functions Core Tools」をインストールします。
(参考:Azure Functions Core Tools の操作)
インストールはnpmコマンドで行うため「node.js」をインストールしていない場合はインストールします。
(参考:Node.js)
なおプロキシ環境下においてnpmコマンドでダウンロードするためには、以下のコマンドでプロキシサーバを設定します。
| npm -g config set proxy http://10.xx.xx.xx:9999 |
| npm -g config set https-proxy http://10.xx.xx.xx:9999 |
コマンドプロンプトから「npm install -g azure-functions-core-tools」と入力して「Azure Functions Core Tools」をインストールします。
| C:\work>npm install -g azure-functions-core-tools |
| C:\Users\xxxx\AppData\Roaming\npm\azfun -> C:\Users\xxxx\AppData\Roaming\npm\node_modules\azure-functions-core-tools\lib\main.js |
| C:\Users\xxxx\AppData\Roaming\npm\func -> C:\Users\xxxx\AppData\Roaming\npm\node_modules\azure-functions-core-tools\lib\main.js |
| C:\Users\xxxx\AppData\Roaming\npm\azurefunctions -> C:\Users\xxxx\AppData\Roaming\npm\node_modules\azure-functions-core-tools\lib\main.js |
| > azure-functions-core-tools@2.7.1846 postinstall C:\Users\xxxx\AppData\Roaming\npm\node_modules\azure-functions-core-tools |
| > node lib/install.js |
| attempting to GET "https://functionscdn.azureedge.net/public/2.7.1846/Azure.Functions.Cli.win-x64.2.7.1846.zip" |
| [==================] Downloading Azure Functions Core Tools |
| + azure-functions-core-tools@2.7.1846 |
| added 52 packages from 32 contributors in 16.715s |
ローカル環境から「Azure Functions」へデプロイ操作を行うための「Azure CLI」をインストールします。
(参考:Windows での Azure CLI のインストール)
またインストール後に忘れず「az login」コマンドでログインしておきましょう。
「Azure Functions」をスケジューリングで実行する場合はスケジュール情報が「Azure ストレージ」に保存されます。
そのためローカルで動かすためには「Azure ストレージ エミュレーター」も必要となります。
「Microsoft Azure SDK」をインストールしていれば含まれているようですが、私は以下のページのリンクから単独でインストールしました。
(参考:Azure ストレージ エミュレーターを使用した開発とテスト)
また「Azure ストレージ エミュレーター」では内部で「SQL Server Express」を使っていますので、こちらもインストールします。
(参考:SQL Server 2017 Express エディション)
前述したガイドに沿ってMavenプロジェクトを準備します。
(参考:Azure での Spring Cloud Function の概要 -> 新しい Maven プロジェクトを作成する)
「pom.xml」には以下のように設定します。ガイドと異なる点は
・「functionAppName」にユニークな関数名を設定します。
・「functionResourceGroup」はデプロイ先の「Azure」のリソースグループ名を指定します。
(参考:Azure Resource Manager の概要 -> リソースグループ)
・「start-class」に後述するSpringコンテナを初期化するクラス(このサンプルでは「jp.co.cresco.xxxx.SpringConfig」)を指定します。
・「functionAppRegion」を東日本リージョン「japaneast」に変更
| UTF-8 |
| 1.8 |
| 1.8 |
| 1.3.2 |
| 1.3.0 |
| ${project.build.directory}/azure-functions/${functionAppName} |
| 1.0.22.RELEASE |
| test-resource |
| test-aoyama-spring-function |
| jp.co.cresco.xxxx.SpringConfig |
| <!-- Japanリージョンに変更 --> |
| japaneast |
また、デフォルト設定のままデプロイすると「専用 (App Service) プラン」になってしまいます。(下記ブログ参照)
「従量課金プラン」としてデプロイするためには、以下のように「azure-functions-maven-plugin」に「priceTier」タグを追加して「Consumption」を設定する必要があります。
| com.microsoft.azure |
| azure-functions-maven-plugin |
| ${functionResourceGroup} |
| ${functionAppName} |
| ${functionAppRegion} |
| Consumption |
アプリケーションの主要なクラスとして以下の3クラスを実装します。
| package jp.co.cresco.xxxx; |
| import org.springframework.cloud.function.adapter.azure.AzureSpringBootRequestHandler; |
| import com.microsoft.azure.functions.ExecutionContext; |
| import com.microsoft.azure.functions.annotation.FunctionName; |
| import com.microsoft.azure.functions.annotation.TimerTrigger; |
| public class FunctionRequestHandler extends AzureSpringBootRequestHandler { |
| @FunctionName("dailyBatch") |
| public void dailyBatch(@TimerTrigger(name = "timer", schedule = "0 0 1 * * *") String timerInfo, |
| final ExecutionContext context) { |
| context.getLogger().info(handleRequest("xxxx", context)); |
| } |
| } |
以下の引数のアノテーション部分に設定されているのが実行スケジュールとなります。下記の例の場合は毎日1:00に実行となります。
| schedule = "0 0 1 * * *" |
スケジュールに設定可能な値は以下を参照ください。
(参考:Azure Functions のタイマー トリガ -> NCRONTAB 式)
| package jp.co.cresco.xxxx; |
| import org.springframework.boot.SpringApplication; |
| import org.springframework.boot.WebApplicationType; |
| import org.springframework.boot.autoconfigure.SpringBootApplication; |
| import org.springframework.context.annotation.ComponentScan; |
| @SpringBootApplication |
| @ComponentScan(basePackages = { "jp.co.cresco.xxx" }) |
| public class SpringConfig { |
| public static void main(String[] args) throws Exception { |
| SpringApplication application = new SpringApplication(SpringConfig.class); |
| application.setWebApplicationType(WebApplicationType.NONE); // webは無効化 |
| ApplicationContext context = application.run(args); |
| SpringApplication.exit(context); |
| } |
| package jp.co.cresco.xxxx; |
| import java.util.function.Function; |
| import org.springframework.stereotype.Component; |
| @Component("dailyBatch") |
| public class DailyBatchFunction implements Function<String, String> { |
| @Override |
| public String apply(String t) { |
| // バッチ処理 |
| ... |
| return "SUCCESS"; |
| } |
| } |
注意点としましては「DailyBatchFunction」が登録されている「@Component」名は「FunctionRequestHandler」に登録されている「@FunctionName」と合わせる必要があります。
(今回の例では「dailyBatch」と合わせています)
- 「Azure Functions」から呼び出された「FunctionRequestHandler」クラスが親クラス「AzureSpringBootRequestHandler」の「handleRequest」を呼び出します。
- 「AzureSpringBootRequestHandler」は「SpringConfig」クラスを呼び出しSpringコンテナを初期化します。
- 「AzureSpringBootRequestHandler」はSpringコンテナから「DailyBatchFunction」を取得し実行します。
間に「AzureSpringBootRequestHandler」を挟むことにより「Azure Functions」のAPIに依存したクラスと通常のSpringのComponentクラスが疎結合になっています。
SpringBootで利用する「application.properties(application.yaml)」とは別に「Azure Functions」用の以下の設定ファイルを準備します。
「/src/main/azure/host.json」は開発した関数アプリケーションに影響を与える構成オプションが設定されます。
(参考:Azure Functions 2.x の host.json のリファレンス)
今回はデフォルト値のみとします。
| { |
| "version": "2.0" |
| } |
「/src/main/azure/local.settings.json」はローカル環境で稼働する場合の設定値を記述します。
(参考:Azure Functions Core Tools の操作 -> ローカル設定ファイル)
ファイルは以下を記述します。
| { |
| "Values": { |
| "AzureWebJobsStorage": "UseDevelopmentStorage=true", |
| "FUNCTIONS_WORKER_RUNTIME": "java" |
| } |
「AzureWebJobsStorage」の設定はローカル環境で「Azure ストレージ エミュレーター」を使うために必要です。
アプリケーションがパッケージ化されたら、「azure-functions Maven」プラグインを使用して実行できます。
| mvn azure-functions:run |
以下が実行結果となります。スケジュールで指定された時刻になればバッチ処理が実行されます。
| [2019/11/20 15:28:32] Generating 1 job function(s) |
| [2019/11/20 15:28:32] Found the following functions: |
| [2019/11/20 15:28:32] Host.Functions.dailyBatch |
| [2019/11/20 15:28:32] |
| [2019/11/20 15:28:32] Initializing function HTTP routes |
| [2019/11/20 15:28:32] No HTTP routes mapped |
| [2019/11/20 15:28:32] |
| [2019/11/20 15:28:32] Host initialized (362ms) |
| [2019/11/20 15:28:33] The next 5 occurrences of the 'dailyBatch' schedule (Cron: '0 0 1 * * *') will be: |
| [2019/11/20 15:28:33] 11/21/2019 01:00:00+09:00 (11/20/2019 16:00:00Z) |
| [2019/11/20 15:28:33] 11/22/2019 01:00:00+09:00 (11/21/2019 16:00:00Z) |
| [2019/11/20 15:28:33] 11/23/2019 01:00:00+09:00 (11/22/2019 16:00:00Z) |
| [2019/11/20 15:28:33] 11/24/2019 01:00:00+09:00 (11/23/2019 16:00:00Z) |
| [2019/11/20 15:28:33] 11/25/2019 01:00:00+09:00 (11/24/2019 16:00:00Z) |
| [2019/11/20 15:28:33] |
| [2019/11/20 15:28:33] Host started (967ms) |
| [2019/11/20 15:28:33] Job host started |
| Hosting environment: Production |
| Content root path: C:\work\pleiades-2019-03\workspace\functions-sample\target\azure-functions\test-aoyama-spring-function |
| Now listening on: http://0.0.0.0:7071 |
| Application started. Press Ctrl+C to shut down. |
| [2019/11/20 15:28:38] Host lock lease acquired by instance ID '0000000000000000000000005D4B558D'. |
MavenをEclipse上で実行するとバックグラウンドで「Azure Functions Core Tools」が動くのですが、Eclipseのコンソール上で「終了」ボタンを押しても終了できません。
再度実行しようとすると
| [INFO] --- azure-functions-maven-plugin:1.3.2:run (default-cli) @ template-functions --- |
| [INFO] Azure Function App's staging directory found at: C:\work\pleiades-2019-03\workspace\functions-sample\target\azure-functions\test-aoyama-spring-function |
| [INFO] Azure Functions Core Tools found. |
| Port 7071 is unavailable. Close the process using that port, or specify another port using --port [-p]. |
| [ERROR] |
| [ERROR] Failed to run Azure Functions. Please checkout console output. |
| [INFO] ------------------------------------------------------------------------ |
| [INFO] BUILD FAILURE |
| [INFO] ------------------------------------------------------------------------ |
| [INFO] Total time: 21.221 s |
| [INFO] Finished at: 2019-11-19T00:04:25+09:00 |
| [INFO] ------------------------------------------------------------------------ |
とエラーになってしまいます。
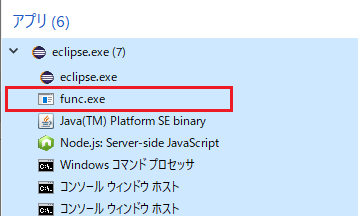
またコンソールに出力する日本語が化けます。。。
こちらはちょっと調査をする時間が足りなく解決に至っていません。。
ローカル環境で稼働確認が取れたら「Azure Functions」にデプロイします。ローカルで動かす場合と同じようにMavenから実行できます。
| mvn azure-functions:deploy |
以下が実行結果です。
| [INFO] --- azure-functions-maven-plugin:1.3.2:deploy (default-cli) @ template-functions --- |
| [INFO] Authenticate with Azure CLI 2.0 |
| [INFO] The specified function app does not exist. Creating a new function app... |
| [INFO] Successfully created the function app: test-aoyama-spring-function |
| [INFO] Trying to deploy the function app... |
| [INFO] Trying to deploy artifact to test-aoyama-spring-function... |
| [INFO] Successfully deployed the artifact to https://test-aoyama-spring-function.azurewebsites.net |
| [INFO] Successfully deployed the function app at https://test-aoyama-spring-function.azurewebsites.net |
| [INFO] ------------------------------------------------------------------------ |
| [INFO] BUILD SUCCESS |
| [INFO] ------------------------------------------------------------------------ |
| [INFO] Total time: 02:08 min |
| [INFO] Finished at: 2019-11-20T23:49:16+09:00 |
| [INFO] ------------------------------------------------------------------------ |
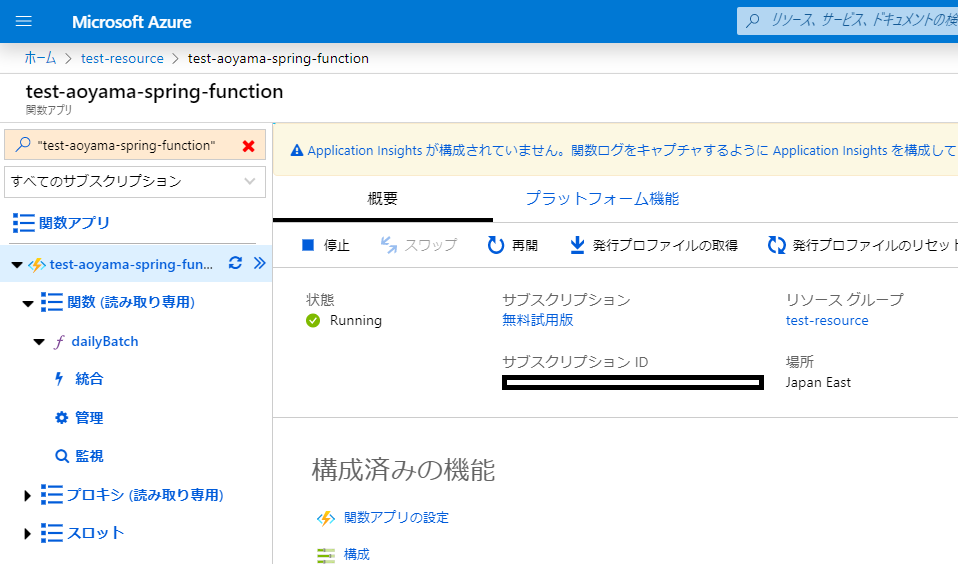
左メニューの関数名リンクをクリック、「実行」ボタンを押下しログの出力結果が問題ないことを確認します。
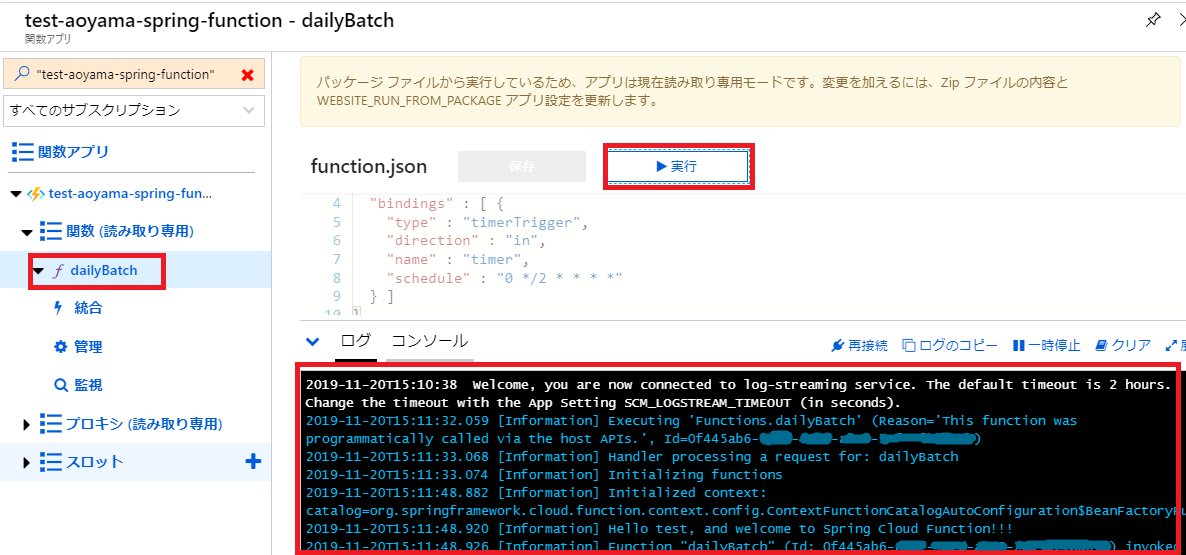
ログの結果が問題なければ正しく動いています。
また今回はデータベースに接続するためのデータソース定義を外部から与えましたので、そのやり方を説明します。
以下のように「spring.datasource.url」「spring.datasource.user」「spring.datasource.password」を「/src/main/azure/local.settings.json」に設定することにより、ローカルで稼働させる場合のデータベースの接続先を変更することができます。
| { |
| "Values": { |
| "AzureWebJobsStorage": "UseDevelopmentStorage=true", |
| "FUNCTIONS_WORKER_RUNTIME": "java", |
| "spring.datasource.url": ""jdbc:sqlserver://xxxx.database.windows.net;databaseName=xxxx;", |
| "spring.datasource.username": "hogehoge", |
| "spring.datasource.password": "hogehoge" |
| } |
| } |
「Azure Functions」上で動くアプリケーションのデータベース接続先を変更するためには、Azure管理コンソールから設定します。
「ホーム」⇒「関数アプリ」⇒「{自身がデプロイした関数}」と選択していきます。下の画面が表示されたら「構成」リンクをクリックします。
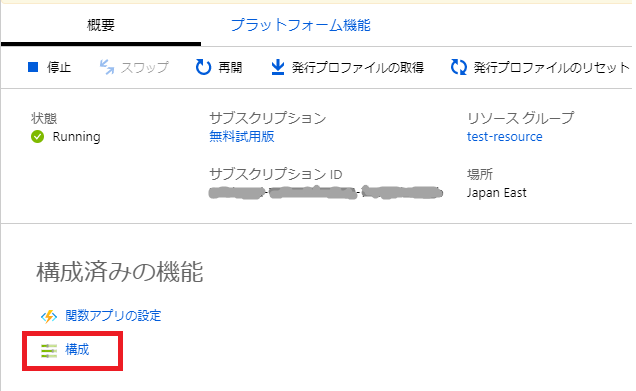
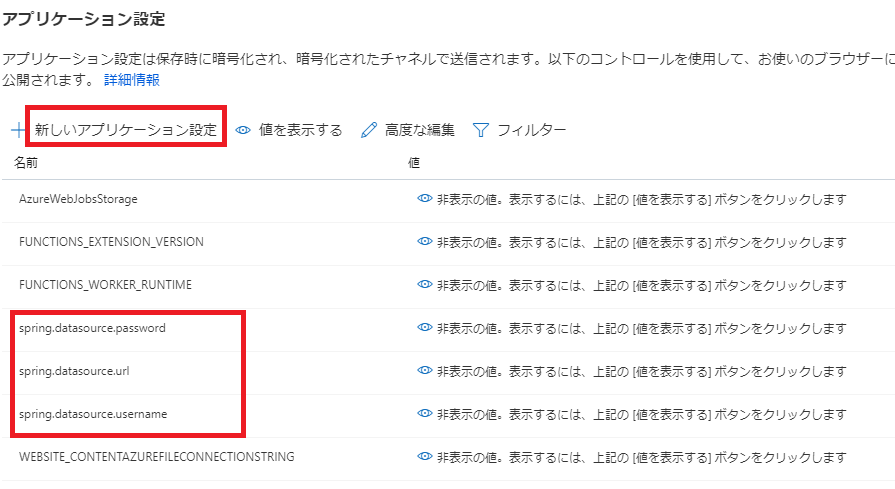
「アプリケーション設定画面」が表示されるので、「新しいアプリケーション設定」リンクをクリックし、「spring.datasource.url」「spring.datasource.user」「spring.datasource.password」を設定します。
ここからは「Azure Functions」の留意点・注意点を述べていきます。
「Azure Functions」の処理のタイムアウト時間はデフォルトでは「従量課金プラン」では「5分」、「専用 (App Service) プラン」では「30分」となっており、それぞれ最大「10分」「無制限」と変更できます。
(参考:Azure Functions のスケールとホスティング -> Function App タイムアウト期間)
設定ファイル「src/main/azure/host.json」に値を設定することにより変更可能です。
| { |
| "version": "2.0", |
| "functionTimeout": "00:10:00" |
| } |
Azure Functionsmの「2.x」ではjava 8しか対応されておらず、また次期バージョンの「3.x」でもまだJava 8だけのようです。
Java 11で開発されている場合は注意してください。
(参考:Azure Functions ランタイム バージョンの概要 -> Languages)
いかがでしたでしょうか?
設定して動かすまでにはずいぶん苦労しましたが、動かせれば通常のSpringBootの開発を行うように関数アプリケーションを開発でき、また簡単にデプロイできるので使いやすいです。
改めてサーバレス(マネージドサービス)の活用が重要だと思いました。
この記事がどなたかの参考になれば幸いです。


