

この記事では、AWS Ampilfyの紹介と、Vue.jsと組み合わせてデモアプリを作ってみた感想を記載しています。
AWS Amplifyは、スケーラブルなモバイルアプリもしくはWEBアプリを簡単に開発するためのJavaScript ライブラリです。
AWS上にスケーラブルなバックエンド環境を構築しながら、
作成したモバイルアプリもしくはフロントエンドアプリケーションと簡単に統合することができます。
フレームワークとして、JavaScript や各種フレームワーク(React, Vue.jsなど)のコンポーネント、CLIやデプロイ環境を構築するconsoleが提供されています。
AWS Amplifyを活用することで、バックエンドのREST API作成だけでなく、認証機能やDBアクセス、ファイルストレージでのデータ管理も簡単に実装することができちゃいます。
- Windows 10 64bit
- Node.js 10.16.2
- npm@6.9.0
- aws-cli/1.16.233
- Vue CLI 3.10.0
※あらかじめAWS CLIを利用するための認証情報(アクセスキー、シークレットキー)をセットしておいてください。
以下のコマンドから、認証情報をセットすることができます。
| aws configure |
まずは、Vue.jsのプロジェクトを作成していきましょう。
vue create "プロジェクト名" でプロジェクトを作成することができます。
プロジェクトの構成について色々聞かれますが、今回は以下のように設定します。
(今回は、カレンダーアプリを想定して amplify-calendar-app と命名しています。)
| $ vue create amplify-calendar-app |
| Vue CLI v3.10.0 |
| ┌───────────────────────────┐ |
| │ Update available: 4.1.1 │ |
| └───────────────────────────┘ |
| ? Please pick a preset: Manually select features |
| ? Check the features needed for your project: Babel, Router, Vuex, Linter |
| ? Use history mode for router? (Requires proper server setup for index fallback in production) Yes |
| ? Pick a linter / formatter config: Prettier |
| ? Pick additional lint features: (Press to select, <a> to toggle all, <i> to invert selection)Lint on save |
| ? Where do you prefer placing config for Babel, PostCSS, ESLint, etc.? In dedicated config files |
| ? Save this as a preset for future projects? No |
次に、AWS Amplifyのライブラリをインストールします。
Vue.jsを使用するため、Vueのコンポーネント用のライブラリをインストールしておきましょう。
| npm install aws-amplify |
| npm install aws-amplify-vue |
最後に、AWS AmplifyのCLIをインストールします。
| npm install -g @aws-amplify/cli |
ここからは、事前に作成したVue.jsのプロジェクト(amplify-calendar-app)に対して、Amplifyの設定を行っていきます。
Amplifyの設定には、Amplify CLIを使用していきます。
amplify init をたたき、プロジェクトの設定内容を入力していきます。
質問に答える形で設定内容を入力できるようになっています。
今回は、以下のように入力してみてください。(ほとんどエンターキーを押すことで自動で入力できるかと思います。)
| $ amplify init |
| Note: It is recommended to run this command from the root of your app directory? Enter a name for the project amplify-calendar-app |
| ? Enter a name for the environment dev |
| ? Choose your default editor: Visual Studio Code |
| ? Choose the type of app that you're building javascript |
| Please tell us about your project |
| ? What javascript framework are you using vue |
| ? Source Directory Path: src |
| ? Distribution Directory Path: dist |
| ? Build Command: npm.cmd run-script build |
| ? Start Command: npm.cmd run-script serve |
| Using default provider awscloudformation |
| For more information on AWS Profiles, see: |
| https://docs.aws.amazon.com/cli/latest/userguide/cli-multiple-profiles.html |
| ? Do you want to use an AWS profile? Yes |
| ? Please choose the profile you want to use default |
ここからが本題です。
Amplify CLIをたたきながら、バックエンドのREST APIを作成してみましょう。
amplify add api を入力することで、APIの作成が始まります。
amplify init の時と同様に、質問に回答する形で作成することができます。
| $ amplify add api |
今回は、REST APIを作成するため、RESTを選択します。
| ? Please select from one of the below mentioned services REST |
APIの名前をつけたのち、APIのリソースパスを定義します。
| ? Provide a friendly name for your resource to be used as a label for this category in the project: AmplifyCalendarAPI |
| ? Provide a path (e.g., /items) /events |
RESTのAPIは、API GatewayとLambda、DynamoDBで構築されます。
はじめに、Lambdaの設定をしてあげましょう。
| ? Choose a Lambda source Create a new Lambda function |
| ? Provide a friendly name for your resource to be used as a label for this category in the project: AmplifyCalendarLambda |
| ? Provide the AWS Lambda function name: AmplifyCalendarLambda |
| ? Choose the function template that you want to use: CRUD function for Amazon DynamoDB table (Integration with Amazon API Gateway and Amazon DynamoDB) |
つづいて、DynamoDBの設定です。
テーブルの属性名や型の種類や、パーティションキー、ソートキーを設定する必要があります。
| ? Choose a DynamoDB data source option Create a new DynamoDB table |
| Welcome to the NoSQL DynamoDB database wizard |
| This wizard asks you a series of questions to help determine how to set up your NoSQL database table. |
| ? Please provide a friendly name for your resource that will be used to label this category in the project: AmplifyCalendarDynamoDB |
| ? Please provide table name: AmplifyCalendarDynamoDB |
| You can now add columns to the table. |
| ? What would you like to name this column: Name |
| ? Please choose the data type: string |
| ? Would you like to add another column? Yes |
| ? What would you like to name this column: Start |
| ? Please choose the data type: string |
| ? Would you like to add another column? Yes |
| ? What would you like to name this column: End |
| ? Please choose the data type: string |
| ? Would you like to add another column? No |
| Before you create the database, you must specify how items in your table are uniquely organized. You do this by specifying a primary key. The primary key uniquely identifies each item in the table so that no two items can have the same key. This can be an individual column, or a combination that includes a primary key and a sort key. |
| To learn more about primary keys, see: |
| http://docs.aws.amazon.com/amazondynamodb/latest/developerguide/HowItWorks.CoreComponents.html#HowItWorks.CoreComponents.PrimaryKey |
| ? Please choose partition key for the table: Name |
| ? Do you want to add a sort key to your table? No |
| You can optionally add global secondary indexes for this table. These are useful when you run queries defined in a different column than the primary key. |
| To learn more about indexes, see: |
| http://docs.aws.amazon.com/amazondynamodb/latest/developerguide/HowItWorks.CoreComponents.html#HowItWorks.CoreComponents.SecondaryIndexes |
| ? Do you want to add global secondary indexes to your table? No |
| ? Do you want to add a Lambda Trigger for your Table? No |
| Succesfully added DynamoDb table locally |
再度、Lambdaの設定について質問が来ます。
今回は追加のLambdaはないため、Noを選択してください。
| ? Do you want to access other resources created in this project from your Lambda function? No |
| ? Do you want to edit the local lambda function now? No |
| Succesfully added the Lambda function locally |
最後に、APIのアクセス権限について設定します。
今回は、認証されたユーザに対してのみCRUDの権限を付与するように設定しましょう。
| ? Restrict API access Yes |
| ? Who should have access? Authenticated users only |
| ? What kind of access do you want for Authenticated users? create, read, update, delete |
| Successfully added auth resource locally. |
| ? Do you want to add another path? No |
| Successfully added resource AmplifyCalendarAPI locally |
| Some next steps: |
| "amplify push" will build all your local backend resources and provision it in the cloud |
| "amplify publish" will build all your local backend and frontend resources (if you have hosting category added) and provision it in the cloud |
以上で、Amplifyフォルダ内にバックエンドAPIに関する情報が保持されます。
APIに必要なLambdaのソースコードもすべて自動で実装されているのが確認できるかと思います。
作成したバックエンドAPIを、AWS環境にデプロイします。
amplify pushを入力することで、Amplifyフォルダ内の情報に基づいてAWSリソースをデプロイしてくれます。
デプロイ時に、デプロイされる内容が確認できます。
- Storage: DynamoDB
- Function: Lambda
- Auth: Cognito
- API: API Gateway
それぞれのリソースはCloudformationで記述されており、Lambdaは、Node.jsのWebアプリケーションフレームワークである Express で実装されています。
| $ amplify push |
| Current Environment: dev |
| | Category | Resource name | Operation | Provider plugin | |
| | -------- | ----------------------- | --------- | ----------------- | |
| | Storage | AmplifyCalendarDynamoDB | Create | awscloudformation | |
| | Function | AmplifyCalendarLambda | Create | awscloudformation | |
| | Auth | cognito40c8b942 | Create | awscloudformation | |
| | Api | AmplifyCalendarAPI | Create | awscloudformation | |
| ? Are you sure you want to continue? Yes |
amplify hosting add によりWebアプリのホスティングに必要なリソースをデプロイできます。
今回はデモ用なので、S3にのみデプロイするようにしました。
| $ amplify hosting add |
| ? Select the environment setup: DEV (S3 only with HTTP) |
| ? hosting bucket name amplify-calendar-bucket |
| ? index doc for the website index.html |
| ? error doc for the website index.html |
つづいて、amplify publish によりVue.jsのプロジェクトのビルドおよびデプロイが実行されます。
| $ amplify publish |
| Current Environment: dev |
| | Category | Resource name | Operation | Provider plugin | |
| | -------- | ---------------- | --------- | ----------------- | |
| | Hosting | S3AndCloudFront | Create | awscloudformation | |
| | Storage | HelloAPIDynamoDB | No Change | awscloudformation | |
| | Function | HelloAPILambda | No Change | awscloudformation | |
| | Auth | cognito14df1d40 | No Change | awscloudformation | |
| | Api | HelloAPI | No Change | awscloudformation | |
Your app is published successfully. のメッセージが表示されると、実際にホスティングされたアプリのアクセスURLが表示されます。
バックエンドの呼び出し処理は、Amplifyで提供されているライブラリを利用します。
DynamoDBの中身を参照するAPIは、パスパラメータにパーティションキー(Name)を指定し、GETメソッドで呼びます。以下は、実装のサンプルです。
| import { API } from 'aws-amplify'; |
| // .... |
| const eventName = 'SampleEventName' |
| let apiName = 'AmplifyCalendarAPI'; |
| let path = '/events/' + eventName; |
| let myInit = { |
| headers: {}, |
| response: true, |
| } |
| API.get(apiName, path, myInit).then(response => { |
| console.log(response) |
| }).catch(error => { |
| console.log(error.response) |
| }); |
また、DynamoDBに書き込むAPIは、リクエストボディにパーティションキー(Name)とそれぞれの属性名(Start, End)を指定し、POSTメソッドで呼びます。
| import { API } from 'aws-amplify'; |
| // .... |
| let apiName = 'AmplifyCalendarAPI'; |
| let path = '/events'; |
| let myInit = { |
| headers: {}, |
| response: true, |
| body: { |
| Name: 'SampleEventName', |
| Start: '2019-12-25', |
| End: '2019-12-26' |
| } |
| } |
| API.post(apiName, path, myInit).then(response => { |
| console.log(response) |
| }).catch(error => { |
| console.log(error.response) |
| }); |
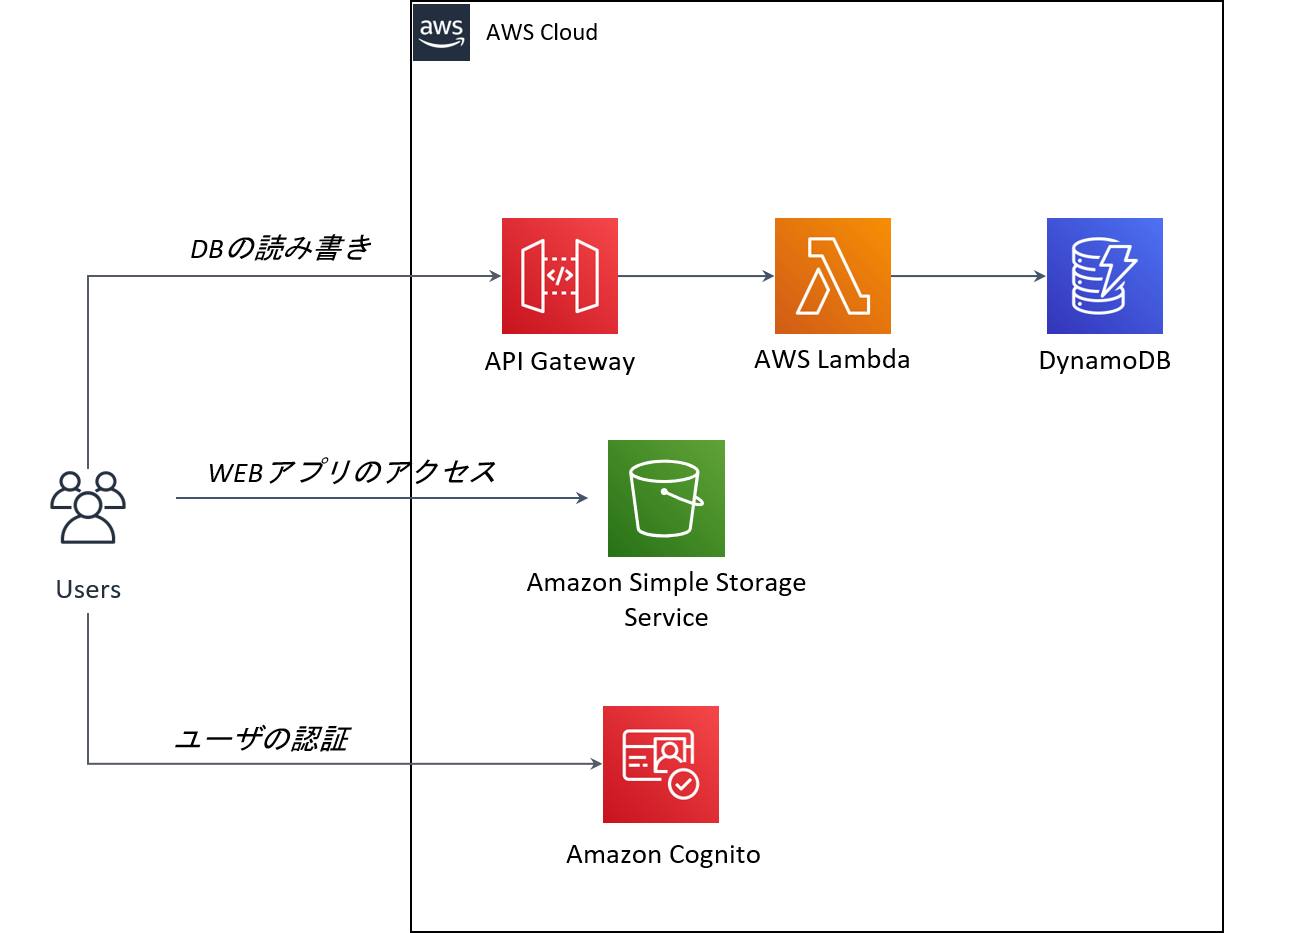
最終的には、以下のような構成になりました。
Amplify CLIのコマンドのみで簡単にWEBアプリケーションを構築することができました。
AWS Amplifyを利用することで、コマンドのみでスケーラブルなWEBアプリケーションを構築することができました。
Lambdaの実装やIAMの設定など、バックエンドの構築に時間がかかる部分が自動化されているため、簡単なWEBアプリケーションなら即座に構築、デプロイすることができるのが最大の魅力だと思います。
今回は紹介しませんでしたが、Amplify Consoleを使用することでCI環境も構築することが可能です。
一方で、高度なアプリケーションの構築になると、Amplify CLI のみでは対応が困難かと感じました。DBアクセス以外の処理を必要とするLambdaの実装であったり、DynamoDBに細かな設定(TTLなど)が必要な場合は、自力でバックエンドを構築していく必要があるかと思います。
今回は、RESTでAPIを構築しましたが、GraphQLで構築することでさらに柔軟なAPIのアクセスが可能になるかと思います。フロントエンドの開発には携わっていたけど、バックエンドのことはあまり経験のない方は、ぜひ AWS Amplifyを使ってみてください。簡単にバックエンドを構築できますし、作成されたAWSリソースを見てみることで勉強にもなるかと思います。
以上です。
- AWS Amplifyの公式ドキュメント
- https://aws-amplify.github.io/docs/js/start?ref=amplify-js-btn&platform=purejs
- AWS AmplifyのGithub
- https://github.com/aws-amplify/amplify-js
- AWS AmplifyのVueサンプル
- https://github.com/aws-samples/aws-amplify-vue