

こんにちは(ほ)です。
私の所属している社内コミュニティでは、IoT についてのドキュメントをGitbookで作成し、EC2上のJenkinsでビルドとデプロイを行っておりました。
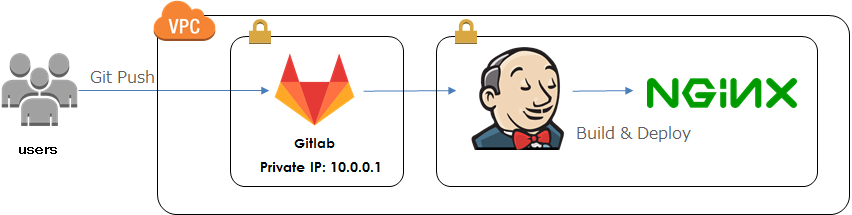
ただ、この環境では下記の点から、コスト的にもったいないと感じていたり、重要なタイミングでサーバの再起動が必要になることがあったため、CodePipeline, CodeBuildを使用したサーバーレス環境に移行することにしました。
- t2.microだと1GBのメモリしかないため、ビルド時にJenkinsがお亡くなりになることがある。
- t2.microだと1GBのメモリしかないため、GitbookのプラグインのインストールでJenkinsがお亡くなりになることがある。
- かといって、大きなインスタンスを起動させておくほどは更新頻度が高くない時期がある。
CodePipeline, CodeBuildはソースコードの取得先がGithubやS3には対応しているのですが、Gitlabには対応していないため、コンソール上の設定だけではすみません。
そこで、Integrating Git with AWS CodePipelineを参考に、下記のような構成で作ることにしました。
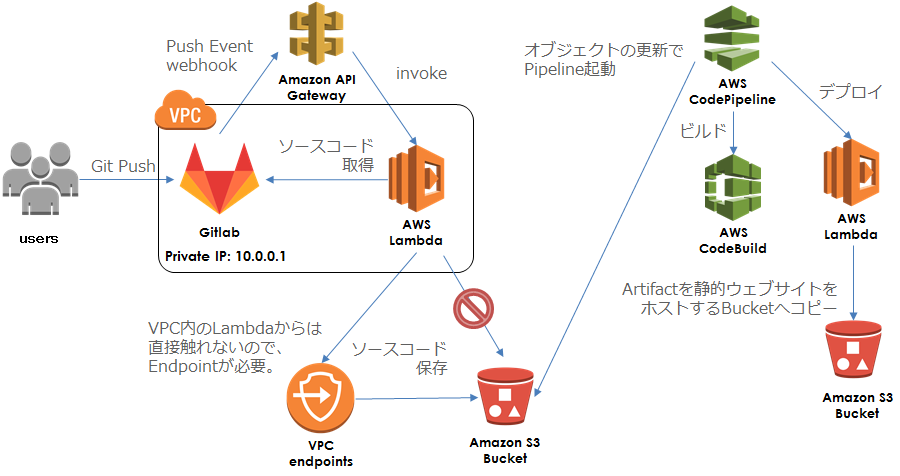
まず、GitlabへPushした際のWebhookを受けるエンドポイントを API Gateway で作成し、下記のLambda function(Python3) と連携させます。
| import os |
| import json |
| import boto3 |
| import io |
| import zipfile |
| import http.client |
| print('Loading function') |
| # CodeBuildのbuildspec.ymlに設定する環境変数 |
| build_env = """ |
| env: |
| variables: |
| branch: """ |
| def lambda_handler(event, context): |
| print(event["ref"]) |
| ref = event["ref"] |
| branch = ref.replace("refs/heads/", "", 1) |
| download_ref = branch.replace("/", "%2F") |
| directory = branch.replace("/", "-") |
| projectHome = event["project"]["homepage"] |
| # ソースコードのダウンロード |
| # TOKENはLambdaの環境変数で設定 |
| headers = { |
| 'private-token': os.environ["TOKEN"], |
| } |
| # Gitlabのドメインを指定 |
| # 利用環境に合わせてドメインを指定したり、HTTPSConnectionを使用してください |
| conn = http.client.HTTPConnection("10.0.0.1") |
| # ZIP形式でダウンロード |
| conn.request("GET", projectHome + "/repository/archive.zip?ref=" + download_ref, headers=headers) |
| res = conn.getresponse() |
| data = io.BytesIO(res.read()) |
| # CodeBuildではZIPのルートにbuildspec.ymlが必要なため、 |
| # ダウンロードしたZIPのルートにある余計なディレクトリを取り除く。 |
| with zipfile.ZipFile(data, "r") as downloaded: |
| print("downloaded") |
| downloaded.printdir() |
| # ZIPのルートにあるディレクトリ名を構築 |
| top_directory_name = event["project"]["name"] + "-" + directory + "-" + event["after"] |
| top_directory_name += "/" |
| file_like = io.BytesIO() |
| with zipfile.ZipFile(file_like, "w") as archive: |
| # Write new zip file |
| for name in downloaded.namelist(): |
| new_name = name.replace(top_directory_name, "") |
| if new_name == "buildspec.yml": |
| # 環境変数を設定 |
| archive.writestr(new_name, downloaded.read(name) + (build_env + directory).encode("utf-8")) |
| elif new_name != "": |
| archive.writestr(new_name, downloaded.read(name)) |
| else: |
| print("invalid path") |
| print("archive") |
| archive.printdir() |
| # CodePipelineで変更を監視するS3のBucketに保存する |
| bucketName = "適当なbucket名" |
| s3 = boto3.resource("s3") |
| bucket = s3.Bucket(bucketName) |
| obj = bucket.Object("source.zip") |
| obj.put(Body=file_like.getvalue()) |
| return "Success" |
ここでは下記のような処理をしています。
- GitlabからソースコードをZIP形式で取得。
- ZIPを解凍し、ルートにあるディレクトリを除去。
- 再度ZIPで圧縮して、CodePipelineで監視しているBucketに置く。
このようなことをしているのは、Gitlabから取得できるソースコードは下記のような形式なのですが、
source.zip
┗ project-branch-hash/
┣ buildspec.yml
┣ README.md
┗ SUMMARY.md
CodeBuildに渡すファイルは下記のように、ZIPの直下にbuildspec.ymlが必要なためです。
source.zip
┣ buildspec.yml
┣ README.md
┗ SUMMARY.md
ちなみに、GitlabにPush時にWebhookで渡されるJSONはこちらを参照してください。
前述のLambdaでは、Gitlabから取得したソースコードをS3に保存しているのですが、実はこのLambdaはVPCで起動しているため、S3を直接触ることができません。
Lambda 関数に VPC 設定を追加した場合、関数でアクセスできるのは、その VPC 内のリソースのみになります。Lambda 関数から VPC リソースとパブリックインターネットの両方にアクセスする必要がある場合は、VPC 内に NAT > (Network Address Translation) インスタンスが必要になります。
そのため、S3にアクセスできるようにVPCのエンドポイントを作成する必要があります。
重要
現在、Amazon S3 のみとの接続のエンドポイントがサポートされています。エンドポイントは IPv4 トラフィックでのみサポートされています。
VPC内のLambdaがS3にファイルを置けるように、endpointのポリシーは下記のように設定しました。
| { |
| "Version": "2012-10-17", |
| "Statement": [ |
| { |
| "Sid": "PutPrivateObject", |
| "Effect": "Allow", |
| "Principal": "*", |
| "Action": "s3:PutObject", |
| "Resource": "arn:aws:s3:::適当なbucket名", |
| "Condition": {} |
| } |
| ] |
| } |
CodeBuildでは、Gitbookをビルドするために、下記のように設定します。
- プロジェクト名 : Gitbook-build(任意)
- ソースプロバイダ : Amazon S3
- バケット : 適当なbucket名
- S3 オブジェクトキー : source.zip
- 環境イメージ : AWS CodeBuild によって管理されたイメージの使用
- オペレーティングシステム : Ubuntu
- ランタイム : Node.js
- バージョン : aws/codebuild/nodejs:7.0.0
- ビルド仕様 : ソースコードのルートディレクトリのbuildspec.ymlを使用
- アーティファクトタイプ : Amazon S3(任意で、No artifactsでも構いません)
CodeBuildでのビルドの設定のために、Gitlabのプロジェクトに下記の buildspec.yml を追加してください。
| version: 0.2 |
| phases: |
| install: |
| commands: |
| - npm install -g gitbook-cli |
| pre_build: |
| commands: |
| # install gitbook plugins |
| - gitbook install |
| build: |
| commands: |
| - gitbook build |
| post_build: |
| commands: |
| # change dirctory name |
| - mv _book $branch |
| artifacts: |
| files: |
| - $branch/**/* |
| discard-paths: no |
| # webhookでの処理で$branch変数を追加します |
このyamlで使用している$branch変数は、前述のLambdaの処理内にてPush時のBranch名を設定するようにしています。
これは、Branchごとに異なるS3のディレクトリに公開するためです。
下記のLambdaでCodeBuildのArtifactをCodePipelineから受け取り、S3に公開します。
CodePipeLineを使用した場合のCodeBuildのArtifactのパスは、CodeBuildに設定したものではなく、CodePipelineから渡されるJSONをパースする必要があります。
| import json |
| print('Loading function') |
| import boto3 |
| from botocore.client import Config |
| import io |
| import zipfile |
| code_pipeline = boto3.client('codepipeline') |
| def lambda_handler(event, context): |
| # print(event) |
| # Get the object from the event and show its content type |
| job_id = event["CodePipeline.job"]["id"] |
| location = event["CodePipeline.job"]["data"]["inputArtifacts"][0]["location"]["s3Location"] |
| bucket = location["bucketName"] |
| key = location["objectKey"] |
| print("bucket: " + bucket) |
| print("key: " + key) |
| s3 = boto3.client('s3', config=Config(signature_version='s3v4')) |
| try: |
| file_like = io.BytesIO() |
| s3.download_fileobj(bucket, key, file_like) |
| # unzip |
| with zipfile.ZipFile(file_like, "r") as archive: |
| # archive.printdir() |
| for info in archive.infolist(): |
| print(info.filename + ": " + content_type(info.filename)) |
| s3.put_object( |
| Bucket="適当なbucket名", |
| Key="public/" + info.filename, |
| Body=archive.read(info.filename), |
| ContentType=content_type(info.filename)) |
| except Exception as e: |
| # Notify codepipeline of failure result |
| code_pipeline.put_job_failure_result(jobId=job_id, failureDetails={"type": "JobFailed", "message":str(e)}) |
| print(e) |
| print('Error getting object {} from bucket {}. Make sure they exist and your bucket is in the same region as this function.'.format(key, bucket)) |
| raise e |
| # Notify codepipeline of success result |
| code_pipeline.put_job_success_result(jobId=job_id) |
| return "Success" |
| def content_type(filename): |
| ext = filename.split(".")[-1].lower() |
| ctype = { |
| "txt": "text/plain", |
| "csv": "text/csv", |
| "html": "text/html", |
| "css": "text/css", |
| "js": "text/javascript", |
| "pdf": "application/pdf", |
| "jpg": "image/jpeg", |
| "png": "image/png", |
| "gif": "image/gif", |
| "bmp": "image/bmp", |
| "ico": "image/ico", |
| } |
| if ext in ctype: |
| return ctype[ext] |
| else: |
| return "binary/octet-stream" |
| # return ctype[ext, "binary/octet-stream"] |
HTMLをS3に置く際に、ContentTypeを設定しないと、”binary/octet-stream”が設定され、ブラウザで開くとダウンロードされるために、content_type()にてファイル形式の判断を行っています。
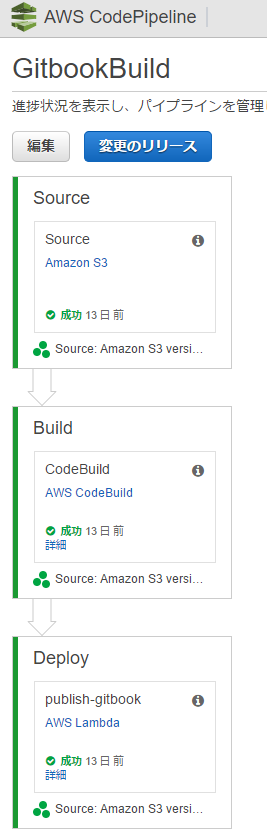
まず、下記の設定値を入力してパイプラインを作成します。
- パイプライン名 : GitbookBuild(任意)
- ソースプロバイダ : Amazon S3
- Amazon S3 の場所 : s3://適当なbucket名/source.zip
- ビルドプロバイダ : AWS CodeBuild
- プロジェクトの設定 : 既存のビルドプロジェクトを選択
- プロジェクト名 : Gitbook-build(3. CodeBuild で設定したプロジェクト)
- デプロイプロバイダ : デプロイなし
次に作成したパイプラインを選択して下記のように編集します。
- 出力アーティファクト#1 : prebuild
- 入力アーティファクト#1 : prebuild
- 出力アーティファクト#1 : release
Buildステージの下をクリックし、Deployステージを作成してアクションを追加します。
- アクションカテゴリー : 呼び出し
- アクション名 : publish-gitbook(任意)
- プロバイダ : AWS Lambda
- 関数名 : 4. Lambdaで作成した関数名
- ユーザパラメーター : 入力なし
- 入力アーティファクト#1 : release
この状態で「変更のリリース」ボタンを押したり、GitlabにPushすることでパイプラインが動き始めるはずです。
最後に、サイトの公開範囲を社内に限定するために、バケットポリシーを下記のように設定しています。
| { |
| "Version": "2012-10-17", |
| "Statement": [ |
| { |
| "Sid": "GetPublicObject", |
| "Effect": "Allow", |
| "Principal": "*", |
| "Action": "s3:GetObject", |
| "Resource": "arn:aws:s3:::適当なbucket名/public/*", |
| "Condition": { |
| "IpAddress": { |
| "aws:SourceIp": [ |
| "IP" |
| ] |
| } |
| } |
| } |
| ] |
| } |
実際はもっと簡単にできると考えていたのですが、buildspec.ymlの場所や環境変数の設定、VPCからS3を触れないなど、色々とつまずくポイントはありましたが何とか出来ました。
今回はGitlabとCodePipelineを連携させてみましたが、Github以外と連携させる需要は意外と多いのではないでしょうか。
また、buildspec.ymlのコマンドを変えれば、当然ですがGitbook以外のプロジェクトもビルドできます。
お手軽にCI環境が欲しい方は試してみてください。