

近年、RAGの精度改善の手法が数多く提案されています。
「リランキング」はその一つで、ベクトル検索の結果をユーザーの意図に合うように並び替え、回答精度を向上させる手法として知られています。
一方、データ分析基盤として知られているDatabricksにも生成AIに関連する機能が次々と追加されていて、先日、「Databricks Reranker」という機能がパブリックプレビューとしてアップデートされました。
導入がとても簡単なので、少し実験を交えつつ試してみたいと思います。
目次
1. データセットの準備
2. RAGの実装
3. Rerankerを試す
1. データセットの準備
今回は、検索対象のドキュメントと、それに関するQAを全てLLM(Large Language Model)に作らせます。
まずは次のコードを動かして架空の会社の社内ドキュメントを作成し、ボリュームに格納します。
今回は日本語非対応の埋め込みモデルを使用するため、英語のドキュメントを作成します。
※ボリュームなどのパスは実行環境に合わせて置き換えてください。
ライブラリのインストール
%pip install langchain databricks-vectorsearch "mlflow[databricks]>=3.4.0" |
dbutils.library.restartPython() |
ドキュメントの作成
import os |
import time |
import glob |
from databricks.sdk import WorkspaceClient |
volume_path = "/Volumes/workspace/default/rag_eval_dataset/" |
w = WorkspaceClient() |
client = w.serving_endpoints.get_open_ai_client() |
# LLMモデルを指定 |
model_name = "databricks-meta-llama-3-3-70b-instruct" |
# プロンプトで作成するドキュメントの内容を指示 |
prompts = [ |
"Please create a detailed internal document of about 10000 characters regarding the work regulations of 〇△× Corporation.", |
"Please create a long internal document of about 10000 characters regarding the information security policy of 〇△× Corporation.", |
~~~ 省略 ~~~ |
] |
for i, prompt in enumerate(prompts, 1): |
response = client.chat.completions.create( |
model=model_name, |
messages=[ |
{"role": "system", "content": "You are an HR representative at a major Japanese company."}, |
{"role": "user", "content": prompt}, |
], |
) |
# 1回目の生成結果を取得 |
initial_text = response.choices[0].message.content |
# さらに文章を拡張するようにLLMに指示 |
expand_prompt = ( |
"Please expand and enrich the following internal document, adding more details, examples, and explanations to make it even longer and more comprehensive:\n" |
+ initial_text |
) |
expand_response = client.chat.completions.create( |
model=model_name, |
messages=[ |
{"role": "system", "content": "You are an HR representative at a major Japanese company."}, |
{"role": "user", "content": expand_prompt}, |
], |
) |
text = expand_response.choices[0].message.content |
# ドキュメントの内容からタイトルを作成するように指示 |
title_prompt = "Please provide a concise and appropriate title (no more than 50 characters) for the following internal document:\n" + text |
title_response = client.chat.completions.create( |
model=model_name, |
messages=[ |
{"role": "system", "content": "You are an HR representative at a major Japanese company."}, |
{"role": "user", "content": title_prompt}, |
], |
) |
title = title_response.choices[0].message.content.strip().replace(" ", "_").replace("/", "_") |
# ドキュメントの保存 |
file_path = os.path.join(volume_path, f"{title}_internal_doc_{i}.txt") |
with open(file_path, "w", encoding="utf-8") as f: |
f.write(text) |
time.sleep(1) |
# ドキュメントの読み込み |
def load_text_files(folder_path, extension="txt"): |
docs = [] |
for filepath in glob.glob(os.path.join(folder_path, f"*.{extension}")): |
with open(filepath, "r", encoding="utf-8") as f: |
docs.append({"filename": os.path.basename(filepath), "content": f.read()}) |
return docs |
docs = load_text_files(volume_path) |
次に、作成したドキュメントをチャンキングして、デルタテーブルに書き込みます。StandardタイプのVector Search Endpointを使用する場合、デルタテーブルはChange Data Feedを有効にしておく必要があります。
from pyspark.sql.types import StructType, StructField, StringType |
from datetime import datetime, timedelta |
import uuid |
from langchain.text_splitter import CharacterTextSplitter |
schema = StructType([ |
StructField("id", StringType(), False), |
StructField("content", StringType(), False), |
StructField("title", StringType(), True), |
StructField("updated_at", StringType(), True), |
]) |
# rag_chunkテーブルを作成 |
spark.sql(""" |
CREATE TABLE IF NOT EXISTS default.rag_chunk ( |
id STRING NOT NULL, |
content STRING NOT NULL, |
title STRING, |
updated_at STRING |
) USING DELTA |
""") |
# CDFを有効にしておきます |
spark.sql(""" |
ALTER TABLE default.rag_chunk SET TBLPROPERTIES (delta.enableChangeDataFeed = true) |
""") |
CHUNK_SIZE = 1000 |
text_splitter = CharacterTextSplitter(chunk_size=CHUNK_SIZE, separator="\n") |
# 各テキストに対してチャンク化 |
chunks = [] |
start_date = datetime(2025, 1, 1) |
date_counter = 0 |
for doc in docs: |
text_chunks = text_splitter.split_text(doc["content"]) |
for chunk in text_chunks: |
updated_at = (start_date + timedelta(days=date_counter)).strftime("%Y-%m-%d") |
chunks.append({ |
"id": str(uuid.uuid4()), |
"content": chunk, |
"title": doc["filename"], |
"updated_at": updated_at, |
}) |
date_counter += 1 |
# Spark DataFrameに変換 |
df_chunks = spark.createDataFrame(chunks, schema=schema) |
# rag_chunkテーブルに追加 |
df_chunks.write.format("delta").mode("append").saveAsTable("default.rag_chunk") |
display(df_chunks) |
続いて、評価用のQAペアを作成します。
MLflowが扱える形にして保存しておきます。
評価用QAを作成
eval_qa = [] |
for doc in docs: |
prompt = f""" |
Based on the following text, generate 10 pairs of questions and answers that test understanding of the content. |
Please use the following output format: |
Q: |
A: |
Text: |
{doc["content"]} |
""" |
response = client.chat.completions.create( |
# Provide a valid model name for your LLM provider. |
model=model_name, |
messages=[{"role": "user", "content": prompt}], |
temperature=0, |
) |
qna_text = response.choices[0].message.content |
print(qna_text) |
# Q&A をRAG用評価データセット形式に整形 |
current_q = None |
current_a = None |
for block in qna_text.split("\n"): |
if block.startswith("Q:"): |
current_q = block.replace("Q:", "").strip() |
elif block.startswith("A:"): |
current_a = block.replace("A:", "").strip() |
if current_q and current_a: |
eval_qa.append({ |
"inputs": {"query": current_q}, |
"expectations": {"expected_facts": [current_a]}, |
}) |
current_q = None |
current_a = None |
print(eval_qa) |
import json |
with open("/Volumes/workspace/default/rag_eval_qa/rag_eval_qa.json", "w", encoding="utf-8") as f: |
json.dump(eval_qa, f, ensure_ascii=False, indent=2) |
print("RAG用評価データセットを作成しました。") |
これで、事前準備は完了です。
2. RAGの実装
続いてRAGの実装に入ります。
ベクトル検索を使うためにVector Search Endpoint, Vector Search Indexが必要になります。
コンピュートの画面で上のタブ → Vector Search → 「エンドポイントを作成」ボタンをクリックし、Vector Search Endpointを作成します。

- 拡大
- 図1:Vector Search Endpoint作成ボタンをクリック
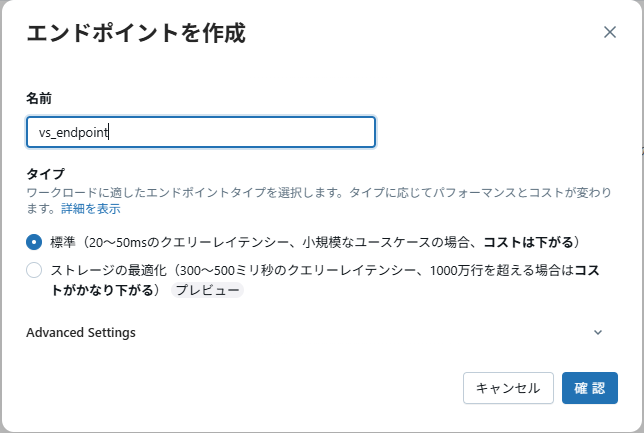
- 拡大
- 図2:Vector Search Endpointの作成
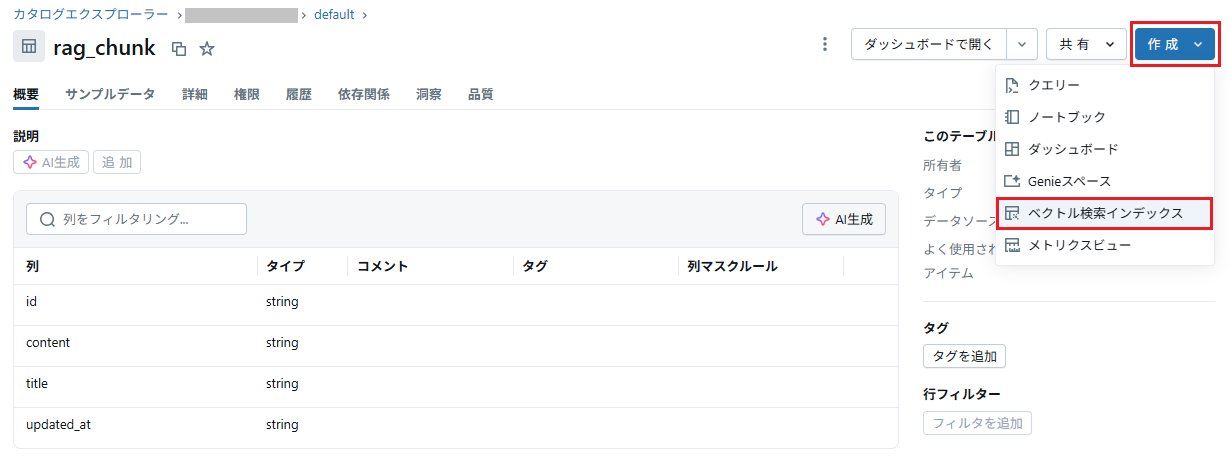
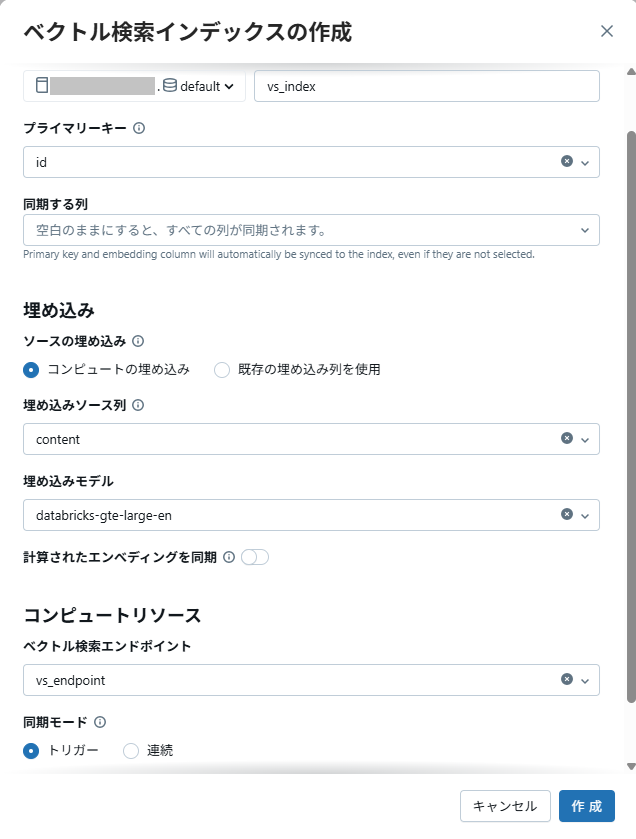
カタログエクスプローラー上で作成したデルタテーブルを開き、Vector Search Indexを作成します。
埋め込みモデルにはdatabricks-gte-large-enを使用します。
- 拡大
- 図3:Vector Search Index作成ボタンをクリック
- 拡大
- 図4:Vector Search Indexの作成
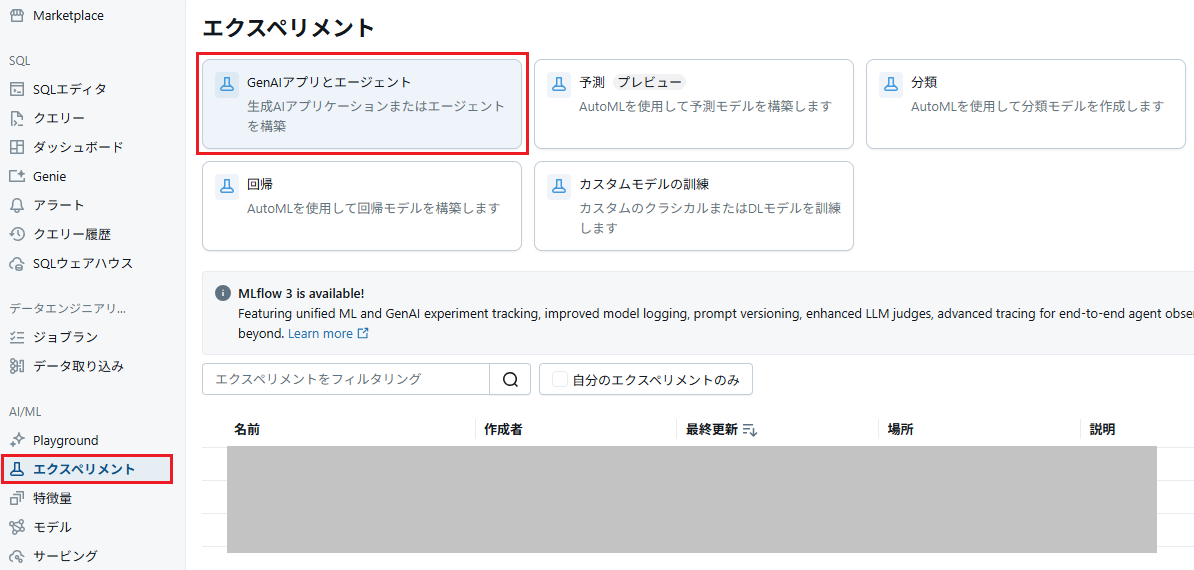
次に、RAG評価のためにMLflowエクスペリメントを作成します。
- 拡大
- 図5:「GenAIアプリとエージェント」をクリック
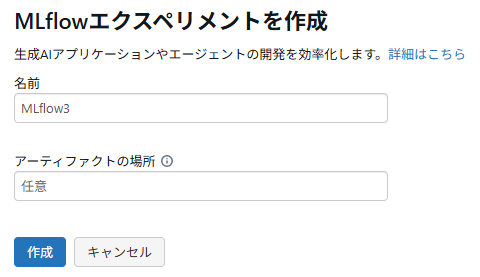
- 拡大
- 図6:MLflowエクスペリメントを作成
これで、必要なものは全て用意できたので、いよいよRAGを実装していきます。
まずはMLflowとVector Searchを利用できるようにします。
MLflowとVector Searchの準備
import mlflow |
from databricks.sdk import WorkspaceClient |
mlflow.openai.autolog() |
mlflow.set_experiment("/path/to/MLflow3") |
from databricks.vector_search.client import VectorSearchClient |
vs_client = VectorSearchClient() |
index = vs_client.get_index(endpoint_name="vs_endpoint", index_name="workspace.default.vs_index") |
続いて、RAGの処理を実装していきます。
RAGアプリの実装
from mlflow.entities import Document |
from typing import List |
@mlflow.trace(span_type="RETRIEVER") |
def retrieve_docs(query: str) -> List[Document]: |
results = index.similarity_search( |
query_text=query, |
columns=["content"], |
num_results=10, |
) |
docs = [] |
data_array = results["result"]["data_array"] |
for i, row in enumerate(data_array): |
content = row[0] |
score = row[1] |
docs.append( |
Document( |
id=f"vs_doc_{i+1}", |
page_content=content, |
metadata={"score": score}, |
) |
) |
return docs |
@mlflow.trace |
def rag_app(query: str): |
retrieved_documents = retrieve_docs(query=query) |
retrieved_docs_text = "\n".join([f"{i+1}. {doc.page_content}" for i, doc in enumerate(retrieved_documents)]) |
messages_for_llm = [ |
{ |
"role": "system", |
"content": f"You are an excellent assistant at 〇△× Corporation. Based on the following context, please answer questions regarding the company: {retrieved_docs_text}. If the information necessary to answer is not included in the context and the question is not of a general nature, please respond with: 'No information was found to answer the question'.", |
}, |
{ |
"role": "user", |
"content": query, |
}, |
] |
response = client.chat.completions.create( |
model=model_name, |
messages=messages_for_llm, |
temperature=0, |
) |
return response |
RAGが実装できたので、予め用意した評価用QAデータセットで実際に評価してみましょう。
import json |
with open("/Volumes/workspace/default/rag_eval_qa/rag_eval_qa.json", "r") as f: |
eval_qa = json.load(f) |
from mlflow.genai.scorers import ( |
Correctness, |
RelevanceToQuery, |
RetrievalRelevance, |
RetrievalSufficiency, |
) |
# Run predefined scorers that require ground truth |
mlflow.genai.evaluate( |
data=eval_qa, |
predict_fn=rag_app, |
scorers=[ |
Correctness(), |
RelevanceToQuery(), |
RetrievalRelevance(), |
RetrievalSufficiency(), |
], |
) |
これを実行した後、MLflowのログを確認すると、RAGの動きを確認できます。
3. Rerankerを試す
similarity_search()関数の引数rerankerにDatabricksRerankerを指定するだけで、Rerankerを試すことができます。
columns_to_rerankには、リランキング時に考慮する情報を指定します。
from databricks.vector_search.reranker import DatabricksReranker |
results = index.similarity_search( |
query_text=query, |
columns=["id", "content", "title", "updated_at"], |
num_results=5, |
reranker=DatabricksReranker(columns_to_rerank=["content"]) |
) |
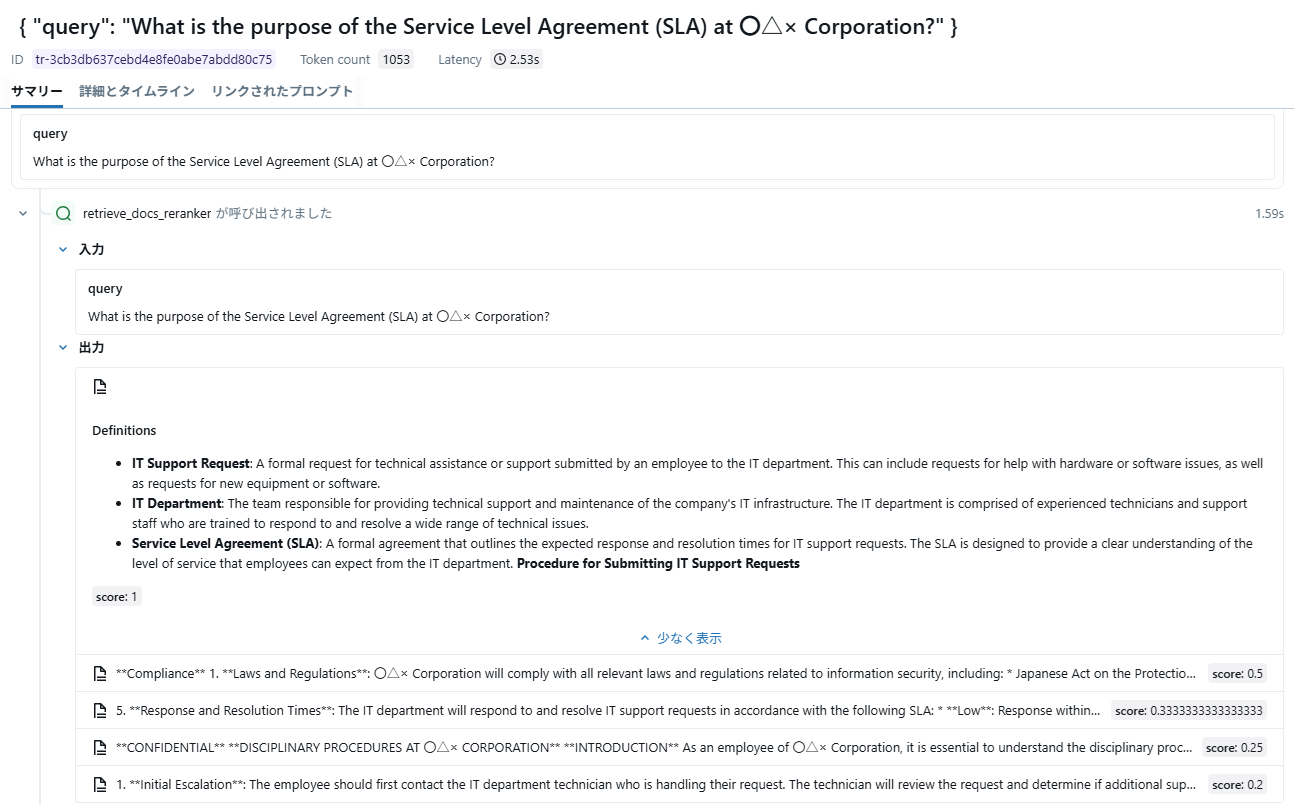
実際に、Rerankerを使わない場合と使う場合の結果を比べてみます。
結果は次のようになりました。
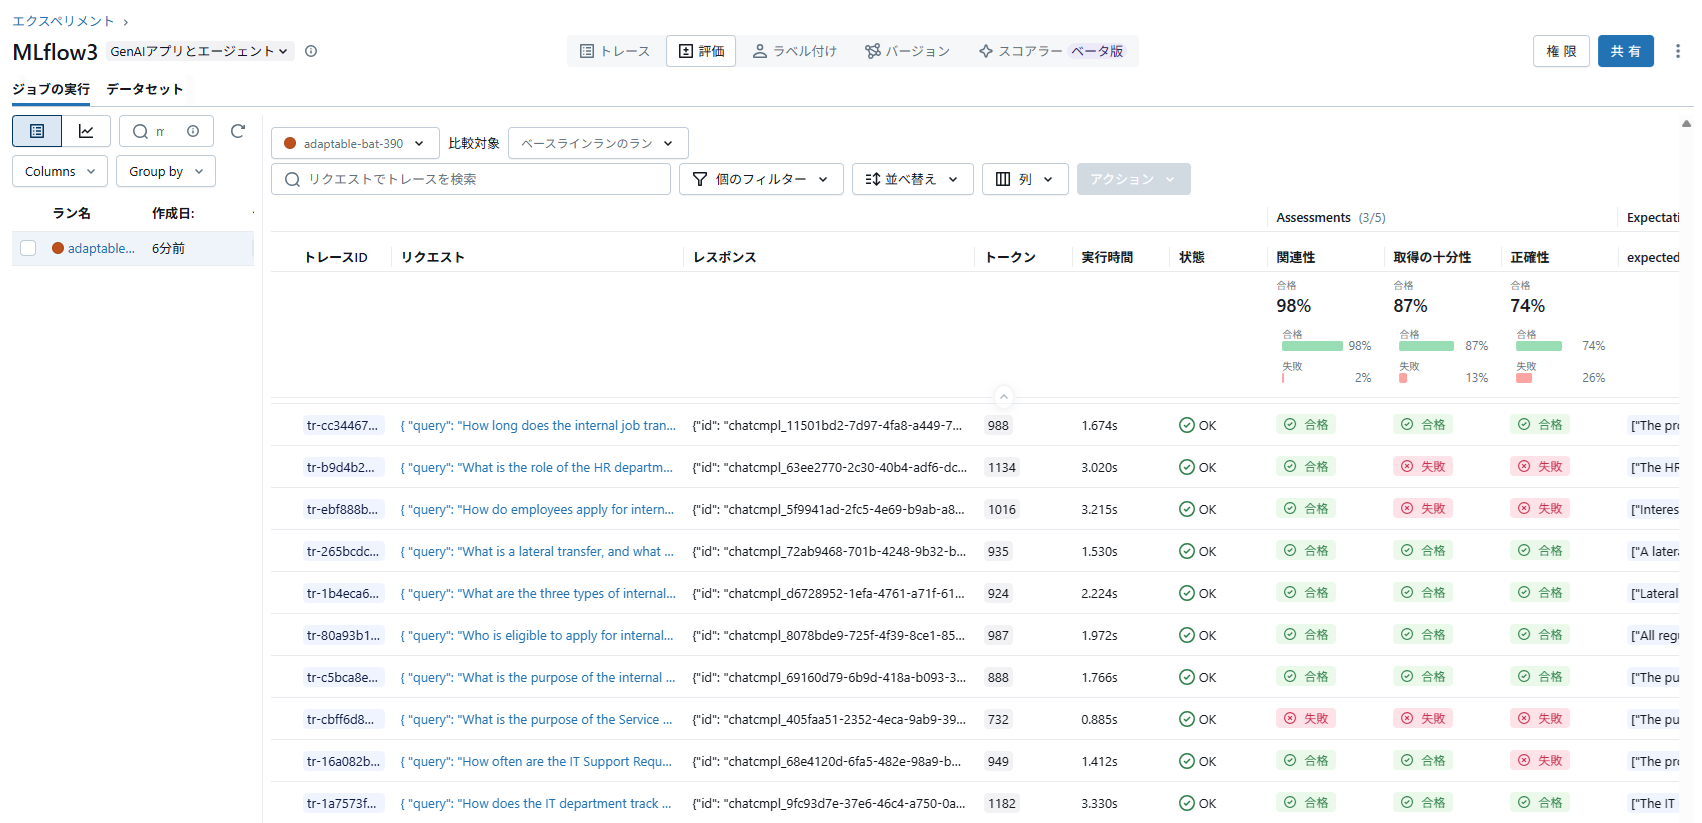
- 拡大
- 図7:Reranker未使用時の結果
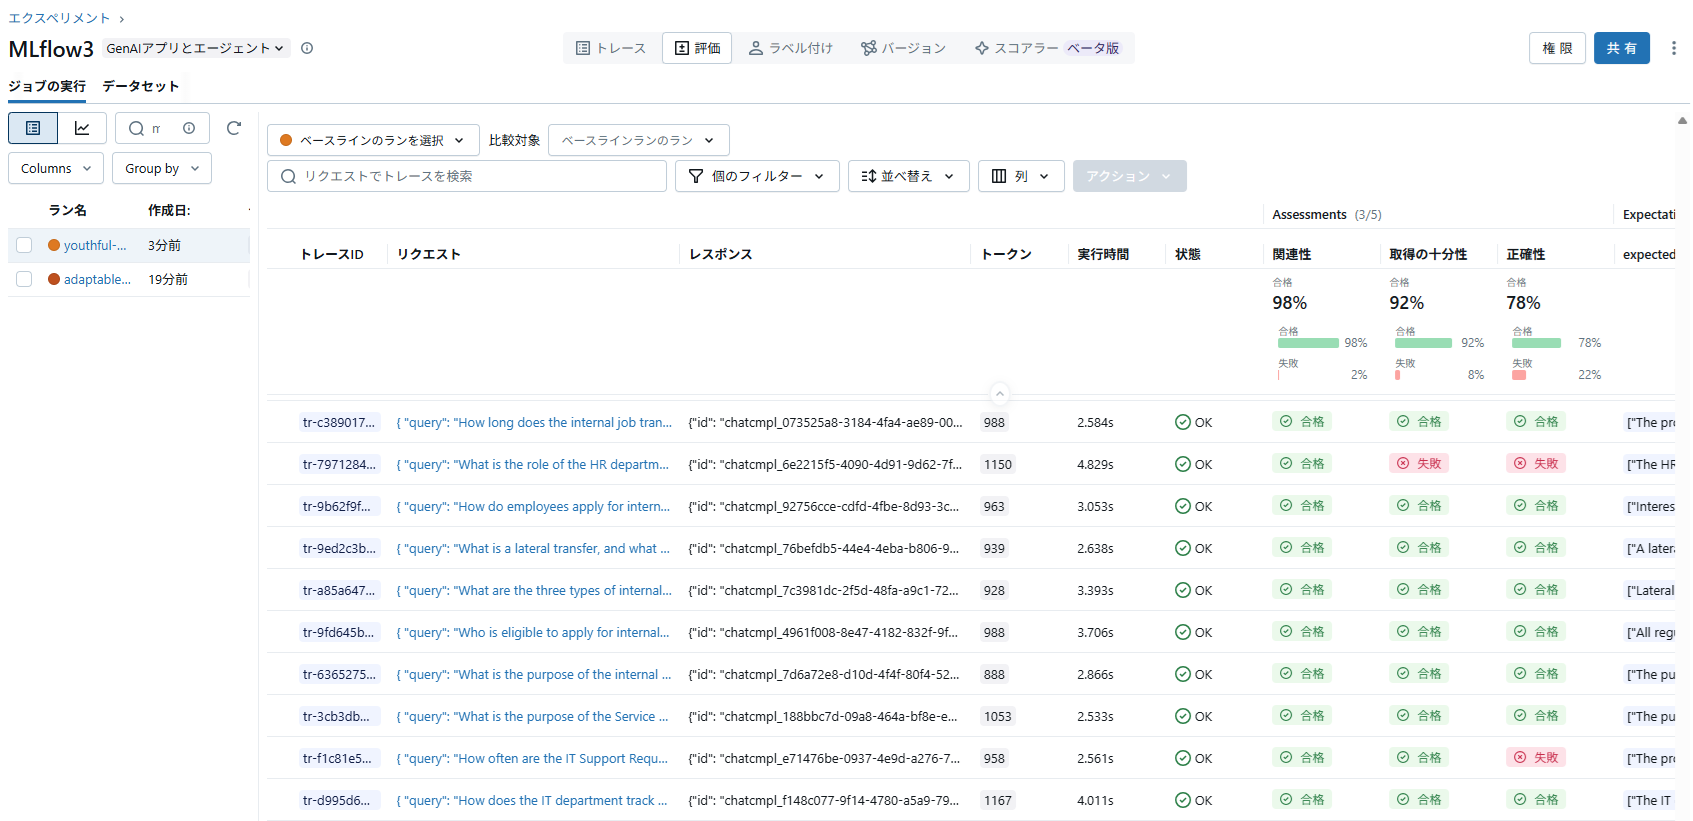
- 拡大
- 図8:Reranker使用時の結果
コンテキストの十分性は87%→92%に、回答の正確性は74%→78%に精度が向上していることが確認できました。(全190件)
Rerankerを使用して改善したケースを見てみると、未使用時は全く検索に含まれませんが、使用時には検索結果のトップに来ていることが分かります。
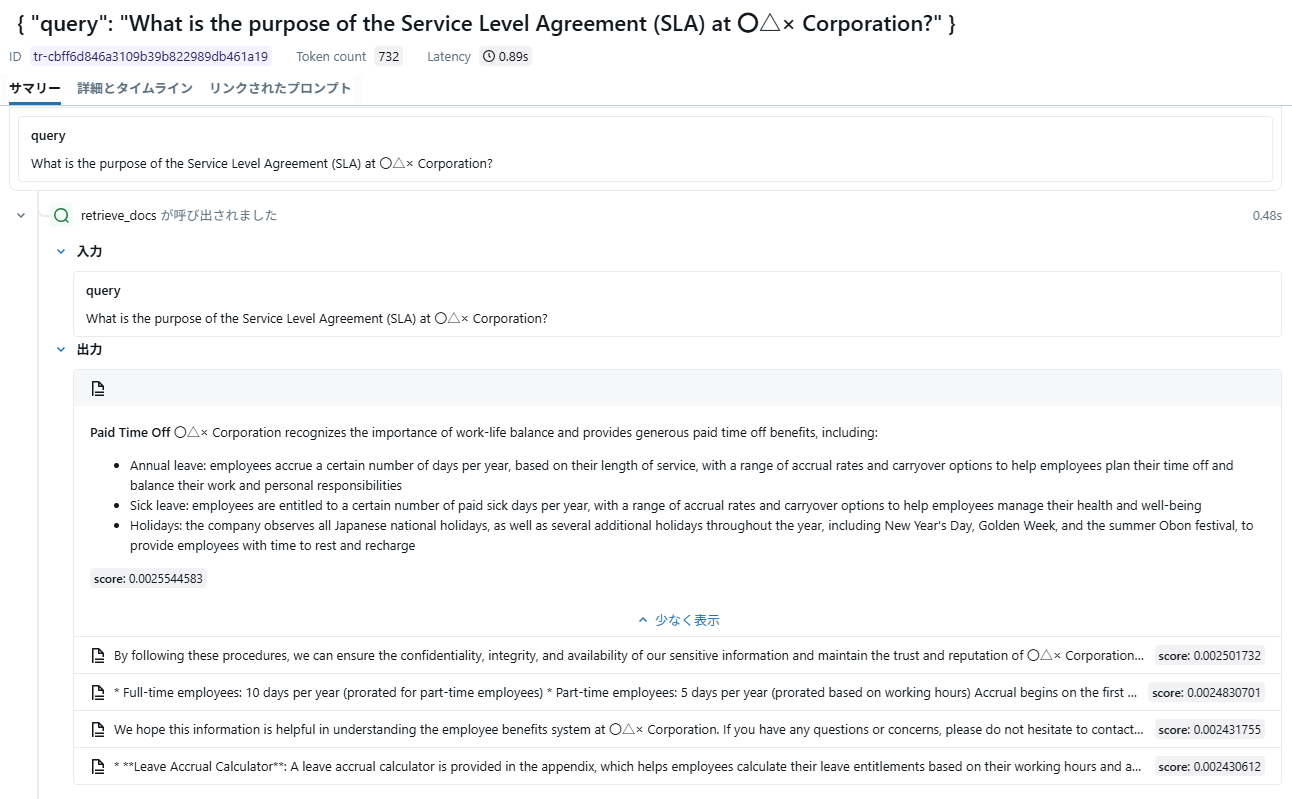
- 拡大
- 図9:Reranker未使用時の結果
- 拡大
- 図10:Reranker使用時の結果
次は、似たような内容のドキュメントが2つあるような状況を再現してみます。
ここでは極端な例として、内容の一部だけを書き換え、タイトルが異なる2つのドキュメントを用意します。
タイトル:New_Employee_Training_Manual
| **Training Manual** ~~~省略~~~ Duration and Evaluation: The program typically lasts one to three months. After each module there are comprehension checks and one-on-one meetings with supervisors. Final evaluation is based on achievement of assigned tasks. |
タイトル:Mid-Career_Training_Manual
| **Training Manual** ~~~省略~~~ Duration and Evaluation: The program typically lasts one to two weeks. After each module there are comprehension checks and one-on-one meetings with supervisors. Final evaluation is based on achievement of assigned tasks. |
次に、リランキングを使用する際にタイトルを考慮するようにします。
from databricks.vector_search.reranker import DatabricksReranker |
results = index.similarity_search( |
query_text=query, |
columns=["id", "content", "title", "updated_at"], |
num_results=5, |
reranker=DatabricksReranker(columns_to_rerank=["content", "title"]) |
) |
そして、以下のような質問文で検索してみます。
| According to the Training Manual, how long is the training period for mid-career hires? |
結果としては次のようになりました。
ちゃんとタイトルが考慮され、正しいドキュメント(「新人研修」ではなく「中途研修」のドキュメント)が取得できるようになっています。

- 拡大
- 図11:Reranker未使用時の結果
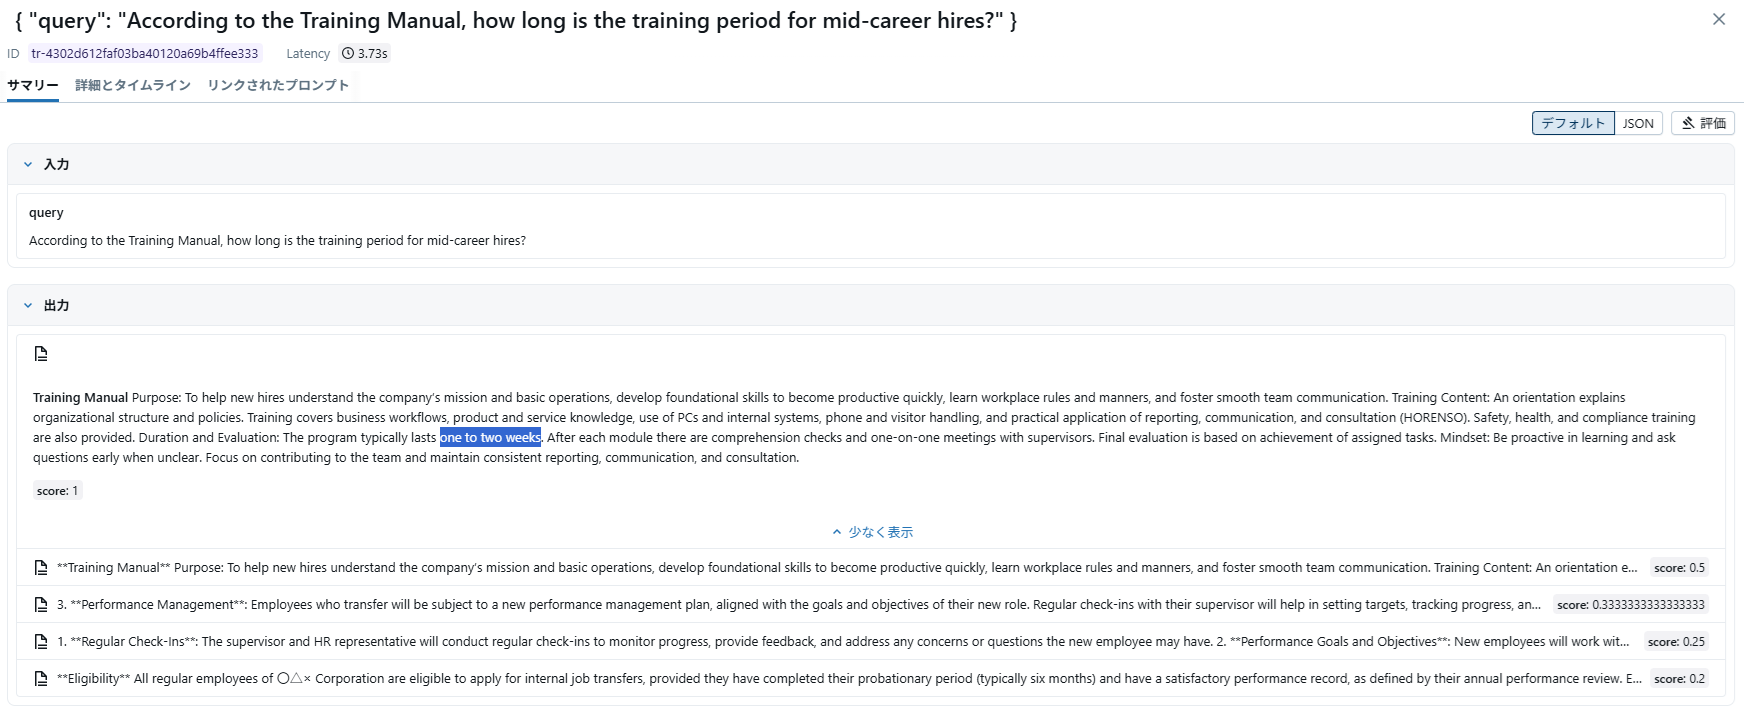
- 拡大
- 図12:Reranker使用時の結果
まとめ
LLMに作らせた簡易的なデータセットでもRerankerの効果がはっきり表れたことには驚きでした。
簡単に導入できることも分かったので、DatabricksでRAGを構築するならぜひ試してみるべき機能だと思います。
ちなみに、更新日付をリランキングのパラメータに入れて、より新しいドキュメントが取得できるようになるか確認する実験も試しましたが、そちらは失敗でした。(むしろ悪化)
もしかしたら得意不得意があるのかもしれません。気になる方はぜひお試しください!